

Table of Contents
- Why a Clogged Dryer Vent Matters
- Sign 1: Clothes Take Multiple Cycles to Dry
- Sign 2: Dryer Overheating During Operation
- Sign 3: Burning Smell or Burning Odor Coming From the Dryer
- Sign 4: Excess Lint Around the Dryer or Vent Opening
- Sign 5: Weak Airflow From the Exterior Vent
- How to Clean a Dryer Vent Safely
- How Often to Clean Dryer Vents
- Frequently Asked Questions
Last Updated: October 18, 2026
Why a Clogged Dryer Vent Matters
When your dryer vent clogged, it becomes one of the most dangerous problems in your home, yet many homeowners ignore it. A clogged vent restricts airflow and traps heat, creating a fire hazard.
Beyond safety, a clogged vent costs you money. Your dryer works harder and runs longer, wasting energy and driving up utility bills. Over time, the strain damages internal components, leading to expensive repairs or replacement.
The good news: most clogged dryer vent problems are preventable. Know the warning signs so you can act before a small issue becomes dangerous.
Sign 1: Clothes Take Multiple Cycles to Dry
If your clothes come out damp after a normal drying cycle, your dryer vent is likely restricted, the most common warning sign we see. A healthy dryer dries a full load in one cycle; when airflow is blocked, moisture stays trapped in the drum and the sensor reports dry when the load is still wet. What should take 45 minutes now takes two hours. Lint and debris accumulate inside the vent duct over time, and even small blockages reduce airflow significantly.
What to check:
- Does your dryer take longer than it used to?
- Are clothes still damp after a full cycle?
- Do you need two or more cycles to fully dry a load?
If you answered yes to any of these, your vent likely needs cleaning. Don’t wait.
Sign 2: Dryer Overheating During Operation
Your dryer should feel warm to the touch, not hot. If the exterior is too hot to hold your hand on comfortably, or the cabinet is hot before the cycle finishes, something is wrong. When a dryer vent is clogged, heat cannot escape. A restriction in the duct, a crushed flexible section, or a stuck exterior flapper backs air up, and the temperature inside the drum and cabinet climbs.
This excessive heat is dangerous for two reasons. First, it is a fire risk: lint in the duct or around the heating element can reach ignition temperature when airflow drops. Second, the heating element, high-limit thermostat, and blower motor degrade faster under prolonged high temperatures.
Most dryers include two safety components worth knowing about:
- High-limit thermostat, opens the heating circuit when internal temperature exceeds a set threshold, then resets when the dryer cools.
- Thermal fuse, a one-time fuse that blows if the thermostat fails or heat keeps climbing. If your dryer suddenly stops mid-cycle and will not restart, a blown thermal fuse is a common cause, and it usually means the underlying airflow problem was never fixed.
Safe checks you can do yourself:
- Run the dryer on a timed cycle and feel the cabinet after 10-15 minutes. Warm is normal; hot to the touch is not.
- Go outside and confirm the exterior vent flap opens and stays open while the dryer runs. A flapper that stays shut or barely moves points to a restriction.
- Pull the lint screen and check it against a light source. A screen that is coated or matted restricts airflow even if it looks clean.
- Confirm the duct behind the dryer is not crushed or kinked against the wall.
If the dryer is overheating, stop using it until the cause is identified. Do not keep running cycles to “see if it clears up”, trapped heat is the condition that starts dryer fires.
If the cabinet is hot, exterior airflow is weak, or the dryer has tripped a thermal fuse, the vent needs professional inspection and cleaning. A technician can measure airflow and temperature drop across the duct to confirm the restriction, replacing a fuse without clearing the blockage just repeats the failure.
Sign 3: Burning Smell or Burning Odor Coming From the Dryer
A burning smell is an emergency. Stop the dryer right away and unplug it. The smell means heat and friction are creating dangerous conditions inside the machine, and lint trapped in the vent or inside the dryer can ignite. Do not run it again until you know the cause. A clogged dryer vent prevents heat from escaping, so the temperature spikes and lint in the duct or around the heating element can reach ignition temperature. This is how dryer fires start.
According to the National Fire Protection Association (NFPA) fire statistics, thousands of home dryer fires occur each year. Most are caused by restricted airflow and lint accumulation.
Immediate steps:
- Unplug the dryer
- Do not use it again until the problem is fixed
- Call a professional to inspect and clean the vent
This is not a DIY emergency. Tampa Bay Appliance Repair LLC offers free diagnostics with repair so you can know exactly what’s wrong and get it fixed safely.
Sign 4: Excess Lint Around the Dryer or Vent Opening
Step outside and look at your dryer’s exterior vent opening while the dryer runs.
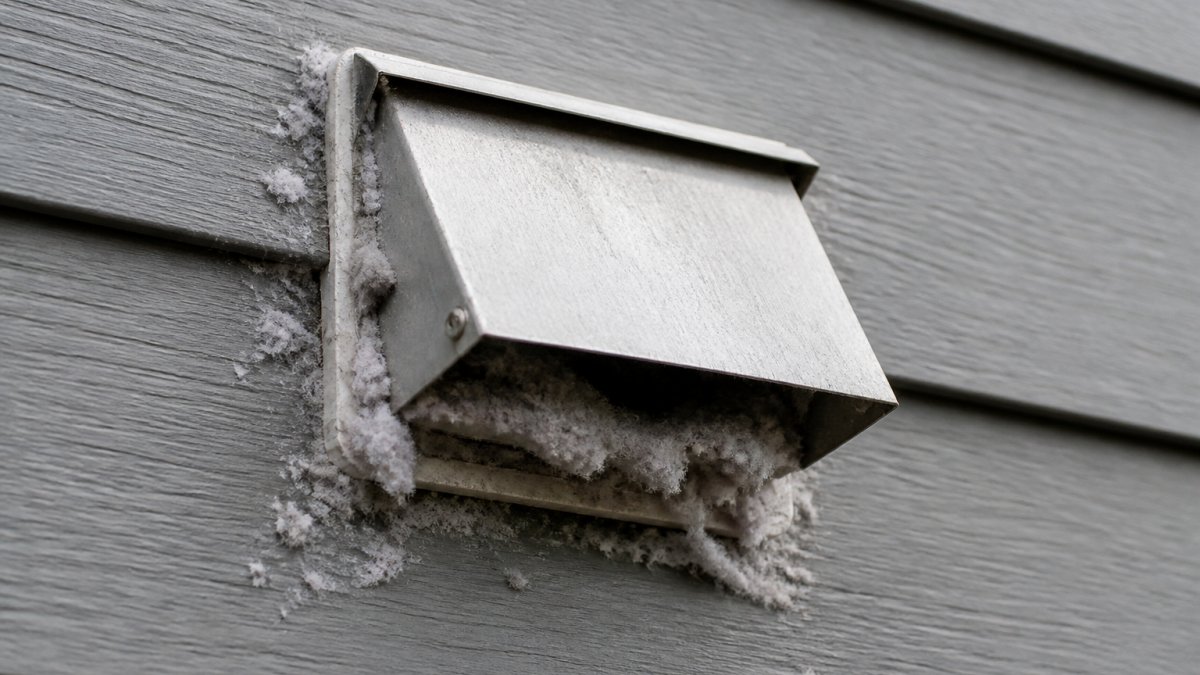
Look inside the vent opening if you can safely reach it. A flapper clogged with debris, a screen packed with lint, or a nest of material all restrict airflow and mean the vent needs cleaning.
Distinguish a vent clog from other lint sources. Excess lint does not always mean the vent is blocked. Run this quick diagnostic first:
- Lint screen packed or coated? Clean or replace it first, then re-test. A matted screen mimics a vent clog.
- Load overloaded or oversized? Overloading reduces tumbling and airflow inside the drum and pushes more lint past the screen. Dry smaller loads and re-check.
- Lint on top of the dryer but not at the exterior vent? That usually points to a loose duct connection or a torn flexible duct behind the machine, not a blockage in the run.
- Lint at the exterior vent but a clean screen? That points to lint accumulating inside the duct, the classic vent-clog pattern.
Vent layout factors that cause lint to collect:
- Long duct runs (many installations exceed the manufacturer’s recommended equivalent length once elbows are counted).
- Sharp 90-degree elbows and multiple turns, each of which adds resistance and gives lint a place to settle.
- Crushed or sagging flexible foil or vinyl duct behind the dryer, a common cause of restricted airflow and lint traps.
- Exterior termination problems: a stuck flapper, a clogged hood, or a screen at the outside wall that packs with lint over time.
- A duct that slopes downward toward the exterior, which lets lint and moisture collect instead of moving out.
Lint buildup outside also attracts pests. Rodents and insects nest in lint and can find their way into the duct and the home.
What to look for:
- Lint visible around the vent opening or on the ground below it
- A weak or barely visible air stream from the vent
- A flapper that does not open fully or stays stuck
- Debris or nesting material inside the opening
Any of these means the vent needs cleaning. Check it monthly, it takes less than a minute and catches restrictions before they become a fire risk.
Sign 5: Weak Airflow From the Exterior Vent
Go outside while the dryer is running and feel the air coming from the exterior vent opening. A healthy dryer produces a forceful stream of warm air; if airflow is weak or barely noticeable, your vent is clogged. Weak airflow means the dryer works harder to push air through the blockage, reducing drying performance and increasing wear. Lint and debris accumulate inside the duct over time, especially if the duct is long or has bends and turns, and poorly installed ducts with too many elbows restrict airflow even when clean.
Test the airflow:
- Run the dryer on a normal cycle
- Go outside to the vent opening
- Feel the air with your hand
Weak airflow is a clear sign that your dryer vent clogged or is partially blocked. This is a good time to schedule a professional cleaning.
How to Clean a Dryer Vent Safely
Cleaning a dryer vent yourself is possible for basic maintenance, but professional cleaning is safer and more thorough. If you clean it yourself, follow these steps carefully.
What You’ll Need Before You Start
Before you begin, gather these supplies:
- Screwdriver (Phillips or flathead, depending on your dryer model)
- Vacuum with hose attachment
- Vent brush kit (available at hardware stores for around $20-40)
- Flashlight
- Work gloves
- Bucket or trash bag for lint
A vent brush kit is essential, its brushes fit inside the duct and remove packed lint. Without proper tools, you risk pushing lint deeper or damaging the ductwork.
Step-by-Step Cleaning Process
Step 1: Unplug the dryer
Safety first. Unplug the dryer before you touch anything to prevent accidental startup.
Step 2: Remove the lint trap and clean it
Open the dryer door and locate the lint trap (usually a screen-covered box inside the drum opening).
Step 3: Access the vent duct
Depending on your model, you may need to remove a panel to access the vent duct connection, consult your manual.
Step 4: Use the vent brush kit
Insert the vent brush into the duct opening, pushing it in slowly while twisting to loosen packed lint. Pull it back out and repeat several times.
Step 5: Clean the exterior vent opening
Go outside and clean the exterior vent opening. Remove any lint or debris blocking the flapper door. Use a brush or cloth to wipe the opening clean.
Step 6: Reconnect and test
Reconnect the vent duct tightly and securely, plug the dryer back in, and run a test cycle. Feel the airflow at the exterior vent, it should be strong and warm.
When to call a professional:
If your vent is very long, has multiple bends, or is deeply clogged, professional cleaning is safer.
How Often to Clean Dryer Vents
Most experts recommend cleaning your dryer vent at least once per year. However, the actual frequency depends on how often you use your dryer and how much lint it produces.
Clean more frequently if:
- You have a large household and run the dryer daily
- You have pets that shed fur
- You notice any of the warning signs mentioned above
- Your vent duct is long or has multiple bends
Standard cleaning schedule:
- Once per year for light to moderate use
- Every 6 months for heavy use
- Every 3-4 months if you have pets
A clogged dryer vent develops gradually. By the time you notice problems, lint has been accumulating for weeks or months.
A clogged dryer vent creates real safety risks in your home. If you’ve noticed any of these five warning signs, your vent needs attention. Whether you clean it yourself or call a professional, don’t wait.
Tampa Bay Appliance Repair LLC specializes in dryer diagnostics and vent cleaning. We offer free diagnostics with any repair, so you’ll know exactly what’s wrong before we start work. Book online and get your dryer back to peak performance.
Frequently Asked Questions
Can a clogged dryer vent cause a dryer to overheat?
Yes. When a dryer vent is clogged, exhaust air cannot escape properly, causing heat to build up inside the drum and cabinet. This excessive heat can damage the dryer’s internal components, trigger automatic shutdowns, and create a fire hazard. If you notice your dryer overheating or stopping mid-cycle, a restricted vent is often the cause. Check the exterior vent opening for blockage and lint buildup immediately.
How often should you clean your dryer vent?
Most manufacturers recommend cleaning your dryer vent at least once per year. However, households with larger loads, multiple people, or pets that shed heavily may need cleaning every 6 months. If you notice extended drying times or weak airflow from the exterior vent before a year has passed, clean it sooner. Regular vent inspection helps prevent lint buildup and maintains drying performance.
How long does it take to clean out a dryer vent pipe?
A basic dryer vent cleaning typically takes 30 minutes to 1 hour for homeowners doing it themselves, depending on vent length and accessibility. Cleaning time increases if the vent is heavily clogged or has multiple bends.
What happens if the dryer vent is not connected or disconnected?
If a dryer vent is disconnected or improperly connected, moisture and lint escape directly into your home instead of outside. This causes damp clothes, extended drying times, excess humidity in your laundry room, and rapid lint accumulation. An unconnected vent also creates a serious fire hazard because lint cannot be expelled safely. Always ensure your vent duct is securely connected to the dryer and runs to an exterior vent opening.