


Table of Contents
- Before You Start: Tools and Safety for Refrigerator Repair
- Step 1: Check Power Supply and Temperature Settings
- Step 2: How to Clean Refrigerator Condenser Coils
- Step 3: Inspect the Evaporator Fan and Air Vents
- Step 4: Refrigerator Not Cooling But Freezer Is: What It Means
- Step 5: Test the Door Gasket and Compressor
- Step 6: Smart Refrigerator Error Codes and Diagnostics
- Step 7: When to Call a Professional and Refrigerator Repair Service Cost
- Quick Reference: Symptom to Fix
- Seasonal Maintenance Schedule
- Frequently Asked Questions
Last Updated: September 25, 2026
Before You Start: Tools and Safety for Refrigerator Repair
A refrigerator not cooling puts your food at risk every hour. This guide walks you through seven steps to find the problem fast, most cooling failures trace back to dirty coils, a bad door seal, or a fan that stopped spinning.
Gather these tools before you start:
- Nut driver set and Phillips screwdriver
- Vacuum with a brush attachment
- Multimeter for testing continuity
- Flashlight and a soft brush
- Towels for any water drips
Never bypass the thermal fuse or force the compressor to start. Doing so can burn out the control board or start an electrical fire.
Step 1: Check Power Supply and Temperature Settings
Start with the simplest fix: confirm the refrigerator has power and the thermostat is set correctly. A tripped breaker or bumped dial explains more no-cool calls than any failed part.
Work through these checks in order:
- Confirm the outlet works by plugging in a lamp.
- Check the breaker box for a tripped switch.
- Look for a reset button near the compressor and press it once.
- Set the thermostat to its middle setting, usually 37°F for the fridge and 0°F for the freezer.
- Wait two hours and check the temperature again.
Step 2: How to Clean Refrigerator Condenser Coils
Dirty condenser coils are the most common cause of a refrigerator not cooling well. When dust blankets the coils, heat cannot escape, and the compressor works harder for less cold.
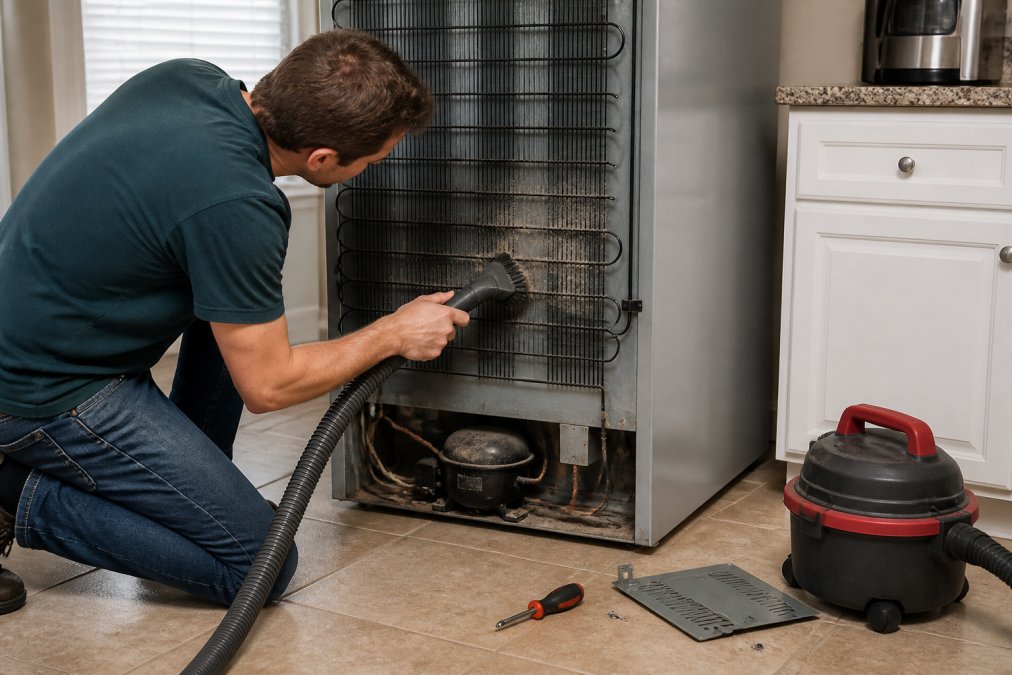
Then follow this routine:
- Brush loose dust off the coil fins.
- Vacuum along the fins with a brush attachment.
- Wipe the area with a damp cloth and let it dry.
- Vacuum the condenser fan blades too.
- Push the unit back, leaving a few inches of clearance.
Step 3: Inspect the Evaporator Fan and Air Vents
Blocked airflow inside the fridge causes warm spots and uneven cooling. The evaporator fan moves cold air from the freezer into the fridge compartment; if it stops, the fridge warms while the freezer stays cold. Open the freezer and listen for a soft hum. Silence points to a failed motor or a blade jammed by ice.
Check these parts:
- The evaporator fan blade for cracks or ice buildup
- The air vents between freezer and fridge for blocked food
- The condenser fan near the coils for debris
Step 4: Refrigerator Not Cooling But Freezer Is: What It Means
When the freezer works but the fridge stays warm, the problem almost always sits in the airflow path between them. The compressor is fine. Cold air simply is not reaching the lower compartment.
Common causes include:
- A failed evaporator fan motor
- A blocked or frozen air damper
- Ice blocking the air return vent
- A control board that stopped signaling the fan
Step 5: Test the Door Gasket and Compressor
A worn door gasket lets cold air escape all day, and the fridge never catches up. Test the seal with the dollar bill trick: close the door on a bill and pull. If it slides out with no drag, the gasket is failing.
Check the gasket this way:
- Run the bill test around the full door frame.
- Look for cracks, tears, or a gasket that no longer sits flat.
- Clean the seal with warm soapy water to restore its grip.
- Replace a gasket that fails in more than one spot.
Before replacing any part, photograph the wiring with your phone. Reconnecting a start relay or fan motor wrong can damage the control board.
Step 6: Smart Refrigerator Error Codes and Diagnostics
Smart refrigerators flash error codes that point straight to the failing system, skipping hours of guesswork. Here is how the codes work across the major brands and how to run the built-in diagnostic mode most owners never touch.
How to Read a Smart Fridge Code
Nearly every modern refrigerator uses the same code families, even when the letters differ by brand. Learn the family, and you can diagnose a model you have never seen.
| Code Family | What It Points To | First Check |
|---|---|---|
| Fan / airflow codes (often prefixed with an F or a fan icon) | Evaporator or condenser fan motor | Ice buildup on the blade, cracked blade, unseated harness |
| Defrost codes (often D, dF, or a snowflake icon) | Defrost heater, defrost timer, or bi-metal thermostat | Frost blanket on the evaporator, open heater element |
| Sensor / thermistor codes (often E, Er, or a thermometer icon) | Thermistor or the control board reading it | Sensor resistance at room temperature, loose connector |
| Communication codes (often C, Com, or a network icon) | Control board wiring or the main-to-sub board harness | Loose ribbon cable, corrosion on the connector pins |
| Door / ice-maker codes | Door switch, auger motor, or water inlet valve | Door alignment, frozen auger, clogged inlet screen |
Brand-Specific Code Behavior
The exact characters vary, but the behavior is consistent:
- Samsung: Codes typically appear as a letter-number pair on the main display, and the unit often keeps running in a limp mode while the code flashes. A fan code usually means the evaporator fan behind the freezer rear panel has iced over or the motor has failed. Samsung’s diagnostic routine is triggered from the control panel and cycles each fan and the defrost heater in sequence.
- LG: LG units frequently display a two-character code and may also emit a repeating beep pattern. A defrost-family code on an LG often traces to the defrost heater or the defrost sensor rather than the main board, so test those two parts before condemning the board.
- GE and GE Profile: Codes often appear alongside a blinking temperature readout. GE’s service mode is entered from the control panel and steps through the fans, the damper, and the thermistors one at a time.
- Whirlpool, Maytag, and KitchenAid: These share a platform and often show a numeric fault code. A damper or airflow code on this platform commonly points to the air damper between the freezer and fridge compartments.
- Bosch and Thermador: Codes are frequently logged silently and only surface in a service menu. If the fridge is warm but no code shows on the display, check the service menu before assuming there is no fault.
Run the Built-In Diagnostic Mode
Most smart refrigerators have a service or diagnostic mode you can trigger from the control panel. The button sequence varies by brand and model year, so check your owner’s manual. Once you are in:
- Write down every code the panel displays before you change anything.
- Let the routine cycle each fan, the defrost heater, the damper, and the thermistors in turn.
- Note which component fails to respond.
- Exit the mode and power-cycle the unit only after you have recorded the codes.
Photograph the code on the display before you reset anything. Codes often clear on a power cycle and will not return until the fault repeats, which can cost you a service call.
What the Codes Do Not Tell You
A code names the system, not always the part. A fan code can mean a failed motor, a jammed blade, or a control board that stopped sending voltage; a sensor code can mean a bad thermistor or a bad board reading a good one. Use the code to narrow the system, then test the part with a multimeter before buying anything.
Never bypass a safety code or jumper a sensor to force the compressor to run. Doing so can over-cool the evaporator, flood the compressor with liquid refrigerant, and destroy it.
Step 7: When to Call a Professional and Refrigerator Repair Service Cost
Some repairs are safe to do yourself; others need a licensed technician, and pushing past that line risks injury or a much bigger bill. Here is how to decide.
Repairs You Can Safely Do Yourself
These jobs involve no refrigerant and no sealed-system work:
- Cleaning condenser coils and fan blades
- Replacing a door gasket
- Replacing an evaporator or condenser fan motor
- Replacing a start relay or run capacitor (after unplugging and discharging the capacitor)
- Replacing a thermistor or air damper
- Thawing a frosted evaporator
Repairs That Require a Licensed Technician
Call a professional for these jobs:
- Any refrigerant leak or sealed system work
- Compressor replacement
- Filter-drier or evaporator replacement
- Control board diagnosis when codes conflict or multiple boards are involved
- Repeated failures after your own fixes
Refrigerant work is regulated. EPA refrigerant handling rules under Section 608 require certified technicians to handle, recover, and recharge refrigerant, and the equipment to do it correctly is not a homeowner tool. Attempting sealed-system work without certification is both illegal and dangerous.
How Repair Pricing Actually Breaks Down
A refrigerator repair bill has three parts: the diagnostic fee, the part, and the labor. Understanding each helps you judge a quote.
- Diagnostic fee: Many shops charge a trip fee that is credited toward the repair if you approve the work. Ask whether the fee is waived or credited before you book.
- Part cost: Simple parts, gaskets, start relays, thermistors, fan motors, are typically less expensive. Sealed-system parts, compressors, evaporators, driers, are generally more expensive.
- Labor: Fan, gasket, and relay swaps are generally quicker jobs. Sealed-system work typically takes longer because it involves recovery, evacuation, and recharge.
The Repair-vs-Replace Decision Matrix
Use the refrigerator’s age and the type of repair to decide. The older the unit and the deeper the repair, the more replacement wins.
| Age of Refrigerator | Simple Repair (fan, gasket, relay, thermistor) | Mid-Level Repair (damper, defrost system, control board) | Sealed-System Repair (compressor, evaporator, refrigerant leak) |
|---|---|---|---|
| Under 5 years | Repair | Repair | Repair, usually under warranty |
| 5-10 years | Repair | Repair | Weigh carefully; get two quotes |
| 10-15 years | Repair | Weigh carefully | Replace |
| Over 15 years | Weigh carefully | Replace | Replace |
Two rules sharpen the matrix:
- The 50% rule. If the quoted repair cost approaches half the price of a comparable new unit, replacement usually makes more sense, especially past the 10-year mark.
- The repeat-failure rule. If the same system has failed twice in a year, the underlying cause is not fixed. Replacement is usually cheaper than a third repair.
Factor In the Hidden Costs
Repair and replace are not just about the invoice:
- Energy: An older refrigerator can draw noticeably more power than a current model. Over several years, that gap can offset part of the price of a new unit.
- Food loss: Every day a warm fridge runs, you risk spoilage. A fast repair has value beyond the part cost.
- Warranty: A new unit comes with a manufacturer warranty. A repair comes with a parts-and-labor warranty from the shop, ask how long it lasts.
- Downtime: A sealed-system repair can take days if a part must be ordered. A new unit is often delivered and installed in a day.
Questions to Ask Before You Approve Any Repair
- What is the exact diagnosis, and which part failed?
- Is the diagnostic fee credited toward the repair?
- What is the parts-and-labor warranty on this repair?
- Is the replacement part OEM or aftermarket?
- If this repair fails, what is the next likely failure on this model?
A shop that answers these clearly is worth considering.
Match the repair type to the refrigerator’s age: simple repairs are almost always worth it, mid-level repairs depend on age, and sealed-system repairs on a unit over 10 years old usually tip toward replacement.
Quick Reference: Symptom to Fix
| Symptom | Likely Cause | Your Next Step |
|---|---|---|
| Fridge warm, freezer cold | Evaporator fan or damper | Test fan, check air vents |
| Whole unit warm | Dirty coils or bad compressor | Clean coils, test start relay |
| Clicks every few minutes | Failed start relay | Replace the relay |
| Frost on back wall | Defrost system failure | Thaw, test heater and timer |
| Cold air escaping | Worn door gasket | Run the bill test, replace seal |
Seasonal Maintenance Schedule
A little upkeep can help prevent the compressor from failing at an inconvenient time. Set these tasks on your calendar:
- Monthly: Check door seals and wipe gaskets clean.
- Every six months: Vacuum condenser coils and fan blades.
- Every year: Pull the fridge out, check the water line, and test the temperature with a thermometer.
- Before summer: Clean coils again, since hot kitchens strain the unit most.
Frequently Asked Questions
How do I reset a fridge that is not cooling?
Unplug the refrigerator from the wall outlet for 5 to 10 minutes, then plug it back in. This power cycle resets the control board and clears temporary faults. If your model has a reset button on the thermostat or control panel, press and hold it for 5 seconds. Wait 24 hours to see if the cooling cycle returns before assuming a hardware failure. If the refrigerator not cooling issue continues, the problem is likely mechanical or electrical.
Why is my fridge running but not cooling?
A running compressor with no cooling usually points to one of four failures: dirty condenser coils restricting heat release, a failed evaporator fan that stops cold air circulation, a refrigerant leak, or a faulty start relay. Check the coils first since they are the most common culprit. Listen for the evaporator fan inside the freezer. If you hear the compressor humming but the fan is silent, the motor or its wiring has failed.
How often should refrigerator coils be cleaned?
Clean condenser coils every 6 to 12 months. Homes with pets or heavy dust should clean them every 3 to 6 months. Dirty coils force the compressor to run longer, which raises energy use and shortens the compressor’s life. Unplug the unit, pull it away from the wall, and vacuum the coils with a brush attachment. This single maintenance task prevents many refrigerator not cooling problems before they start.
Is it worth fixing a refrigerator that is not cooling?
It depends on the age and the repair. A refrigerator under 8 years old with a failed fan motor or start relay is usually worth repairing since parts are typically inexpensive and the fix is often straightforward. A unit over 12 years old with a bad compressor or refrigerant leak often costs more to fix than it is worth. Get a professional diagnostic before deciding. Many providers apply the diagnostic fee toward the repair if you proceed.